| Date | Version | Author | Description |
| Sep 9, 2025 | V1.0 | VuCN | First version |
Contents
1.1 What is Multi-Factor Authentication (MFA)?
1.2 Why is MFA important for Akabot Center?
2.1 System-Required MFA (Mandatory)
2.2 System-Optional MFA (User/Admin Controlled)
3. Management & Troubleshooting
1. OVERVIEW
1.1 What is Multi-Factor Authentication (MFA)?
Multi-Factor Authentication (MFA) is a security method that requires users to provide two or more verification factors to gain access to a resource, such as an application or online account. Instead of simply entering a username and password (something you know), MFA requires one or more additional credentials from the following categories:
- Knowledge: Something you know, like a password or PIN.
- Possession: Something you have, such as a smartphone (via an authenticator app) or a physical security token.
- Inherence: Something you are, like biometric data such as a fingerprint or facial recognition.
1.2 Why is MFA important for Akabot Center?
Akabot Center is the central hub for operating, managing, and monitoring all software robot (bot) activities. Securing access to Akabot Center is critically important to ensure the security of the entire enterprise automation system. Applying MFA for Akabot Center brings practical benefits:
- Enhanced Security: Effectively prevents account takeover attacks, even if a user’s password is compromised.
- Protection of Sensitive Data: Ensures that only authorized users can access critical bot processes, data, and configurations.
- Risk Mitigation: Minimizes the risk of bots being controlled without authorization, which could disrupt operations or cause business damage.
- Compliance with Security Standards: Meets information security requirements and aligns with industry security regulations.
2. MFA Activation Guide
Depending on your organization’s security policy, Multi-Factor Authentication (MFA) deployment on Akabot Center can be carried out in two ways:
2.1 System-Required MFA (Mandatory):
In this case, MFA will be applied to all users (including Administrators). Every account is required to set up and use MFA to log in.

MFA configuration details:
- display.enabled: true
- Meaning: MFA is enabled and active in the system.
- display.required: true
- Meaning: MFA is mandatory for all users.
- Since enabled: true and required: true, MFA is active and users must enable it.
- secret-key: bDL6WVBc+MjeUGs0mQ0Po6lEFUNKxkwkUC2jGC0kfwU=
- Meaning: Secret key used to encrypt the user's secret key and backup codes.
- otp-max-failure-count: 3
- Meaning: Maximum number of incorrect OTP attempts before account lockout or timeout.
- In this example, users have 3 attempts.
- backup-code
- length: 10 → Each backup code has 10 characters.
- count: 5 → 5 backup codes are provided for the user in case the primary OTP is unavailable.
- failed-attempt-timeout: 30000
- Meaning: Timeout period after exceeding the maximum number of failed OTP attempts.
- 30000 ms = 30 seconds before the user can try again.
- *cleanup-schedule-cron: "0 0/5 * * * "
- Meaning: Cron schedule for cleaning up old MFA data.
- Runs every 5 minutes. Used to clear failed attempt counts, old backup codes, or invalid MFA sessions.
A. General Instructions
When the policy takes effect, from the next login attempt you will need to set up MFA by following these steps:
Step 1: Log in with your username and password as usual.

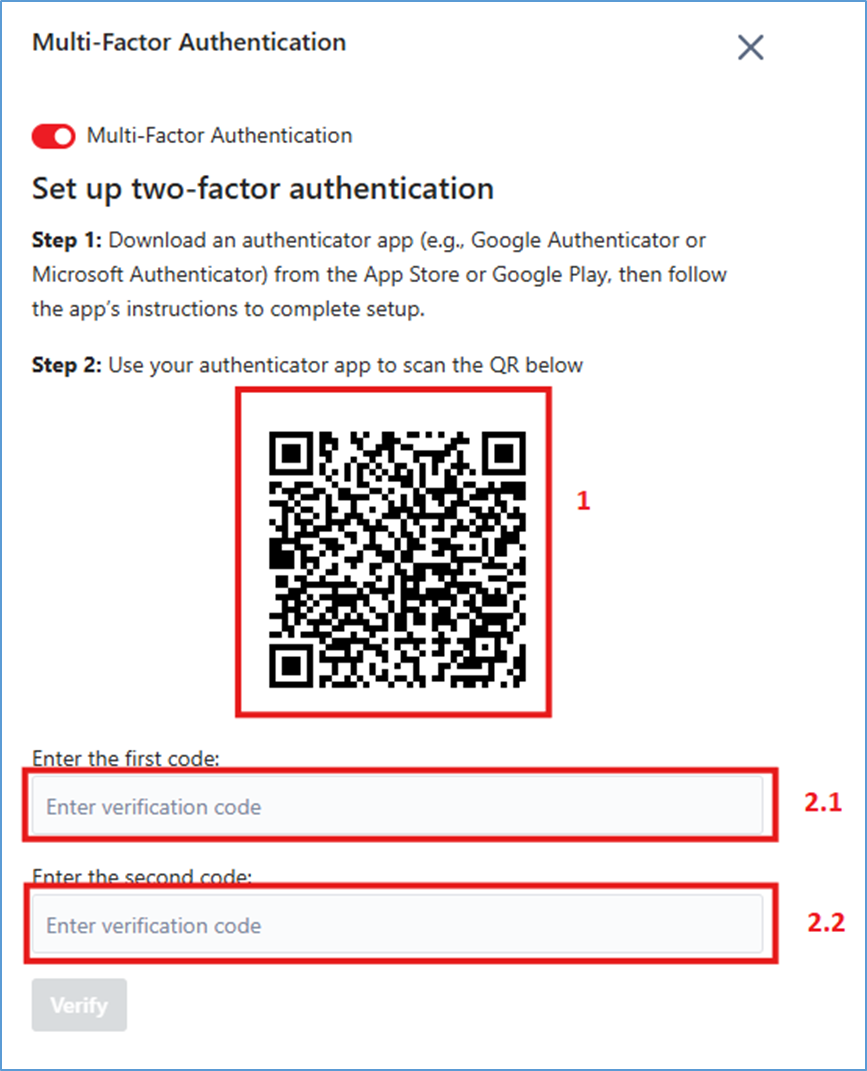
Step 2: Scan the QR code (box number 1 in the image):
- Open an authenticator app (Google Authenticator, Microsoft Authenticator, etc.) on your phone.
- Use the app to scan the QR code displayed on the screen.
- If scanning is not possible, choose Manual Entry and enter the provided Secret Key.

Step 3: Enter the authentication code from the app:
- Enter the first code in “Enter the first code” (box 2.1 – Step 3).
- Wait for the next code to appear (about 30 seconds), then enter it into the “Enter the second code” (box 2.2 – Step 3).
Note: Entering two consecutive codes ensures that the app and the system are properly synchronized.
Step 4: Click “Verify” to complete the setup.
Step 5: Save the Backup code and keep it in a secure place. (Option)
These codes can be used to log in if you lose access to the authenticator app. Save them securely by one of the following methods:
- Copy All: Copy the codes and store them in a password manager or a secure personal file.
- Download: Download the file containing the codes and keep it in a safe place.

Step 6: Click “Login” to complete the MFA setup and sign in to the system. If you cannot access the app, use one of your saved Backup codes as a substitute.
2.2 System-Optional MFA (User/Admin Controlled)
In this case, MFA is only an optional security feature. Users can choose to enable or disable it based on their needs.

MFA configuration details:
- display.enabled: true
- Meaning: MFA is enabled/active in the system.
- If set to false, MFA is disabled and users are not required to set it up.
- display.required: false
- Meaning: MFA is not mandatory for users.
- If set to true, the system requires all users to enable MFA (System-Required MFA).
- Combined with enabled: true, this means MFA is available, but users can choose to turn it on or off.
- secret-key
- Meaning: Secret key used to encrypt the user's secret key and backup codes.
- otp-max-failure-count: 3
- Meaning: Maximum number of incorrect OTP attempts before the account is locked or times out.
- In this example, the user has 3 OTP attempts.
- backup-code
- length: 10 → Each backup code consists of 10 characters.
- count: 5 → 5 backup codes are issued to the user for use when the primary OTP is unavailable.
- failed-attempt-timeout: 30000
- Meaning: Timeout duration after exceeding the maximum number of incorrect OTP attempts.
- A value of 30000 usually means 30,000 ms = 30 seconds before the user can try again.
- *cleanup-schedule-cron: "0 0/5 * * * "
- Meaning: Cron schedule for cleaning up old MFA data.
- "0 0/5 * * * *" → Runs every 5 minutes.
- Used to clear failed attempt counts, old backup codes, or invalid MFA sessions.
B. Administrator Guide
Step 1: Log in to Akabot Center with an administrator account.
Step 2: Navigate to Administration → Users.
Step 3: From the user list, select the account for which you want to enable MFA.
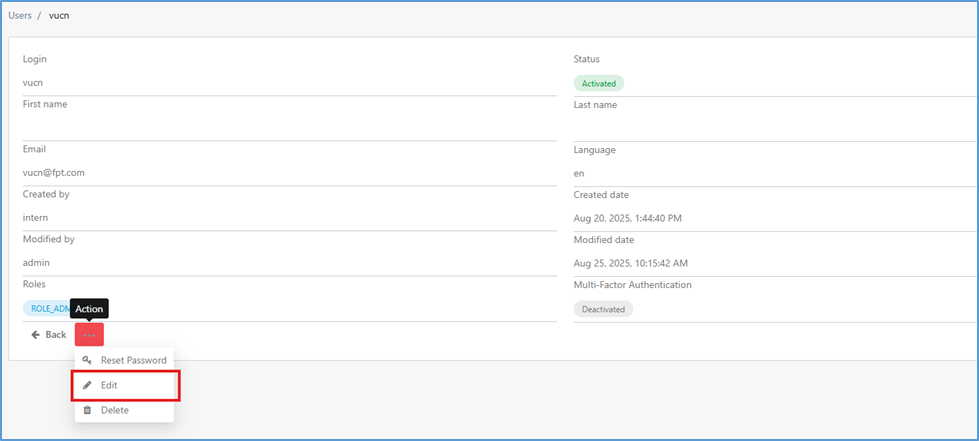
Step 4: Open the account details and click the Action button.

Step 5: Select Edit.
Step 6: On the “Update an User screen”, switch the toggle from Off → On to enable MFA.

Step 7: Click “Save” to confirm the action. The selected user will be required to set up MFA on their next login (scan QR code, enter authentication codes, and save Backup Codes).
C. User Guide
You have full control over the MFA status of your account.
Enable MFA:
Step 1: Log in to Akabot Center.
Step 2: Click My Profile.

Step 3: Select Multi-Factor Authentication.

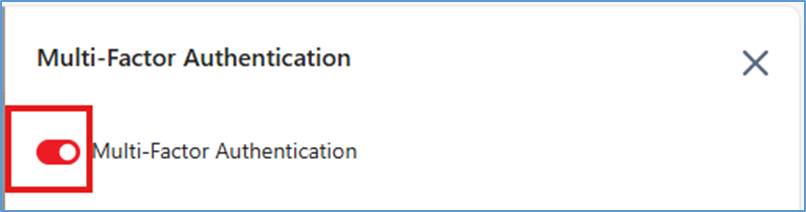
Step 4: On the Multi-Factor Authentication screen, switch the toggle and confirm to enable MFA.

Step 5: Scan the QR code (box number 1 in the image)
- Open an authenticator app (Google Authenticator, Microsoft Authenticator, etc.) on your phone.
- Use the app to scan the QR code displayed on the screen.
- If scanning is not possible, choose Manual Entry and enter the provided Secret Key.
Step 6: Enter the authentication code from the app:
- Enter the first code in “Enter the first code” (box 2.1 – Step 5).
- Wait for the next code to appear (about 30 seconds), then enter it into the “Enter the second code” field (box 2.2 – Step 5).
Note: Entering two consecutive codes ensures that the app and the system are properly synchronized.
Step 7: Click “Verify” to complete the setup.
Step 8: Save the Backup code and keep it in a secure place.

These codes can be used to log in if you lose access to the authenticator app. Save them securely by one of the following methods:
- Copy All: Copy the codes and store them in a password manager or a secure personal file.
- Download: Download the file containing the codes and keep it in a safe place.
Step 9: After saving the Backup Codes, click “Save” to complete the MFA setup.
How to Disable MFA
Step 1: Log in to Akabot Center.
Step 2: Click “My Profile”.

Step 3: Select “Multi-Factor Authentication”.

Step 4: On the Multi-Factor Authentication screen, switch the toggle and confirm to enable MFA.
3. Management & Troubleshooting:
3.1 Management:
Reset MFA
Step 1: Log in to Akabot Center using an account with administrator account.
Step 2: Navigate to Administration → Users.
Step 3: From the user list, select the account that needs MFA reset to open its detail page
(Note: Only reset MFA for users who have already enabled it).
Step 4: Click the Action button.

Step 5: Select “Reset MFA”
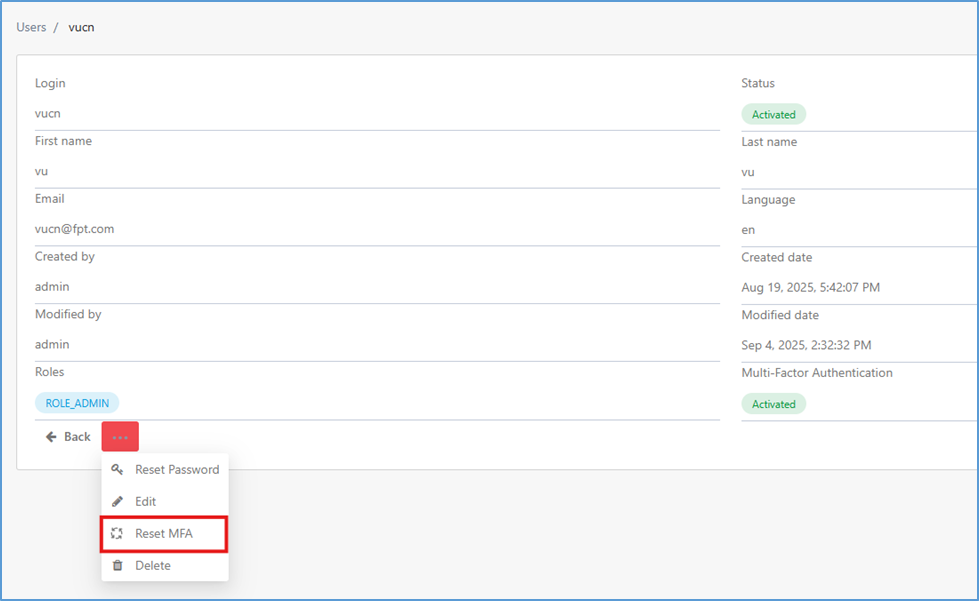
Step 6: Confirm.
3.2 Troubleshooting
Unable to scan the QR code:
- Check your phone’s camera and ensure proper lighting.
- Try using the Manual Entry option with the provided secret key.
Invalid authentication code:
- Verify that your phone’s clock is synchronized with international time. Time discrepancies are a common cause of this error.
- Make sure you are entering the code for the correct Akabot Center account in your authenticator app.
Lost phone or authenticator device:
- Use one of the recovery codes you previously saved to log in.
- After logging in successfully, go to your account’s security settings to disable the old MFA and set it up again with your new device.
- If you do not have recovery codes saved, contact your system administrator for assistance.
Was this article helpful?
That’s Great!
Thank you for your feedback
Sorry! We couldn't be helpful
Thank you for your feedback
Feedback sent
We appreciate your effort and will try to fix the article